10 Years, One Prime Rib: The 3‑Day Dry Brine That Changed Everything
Achieve smoky aroma, a dark peppery bark, and restaurant‑level rosy doneness at home. This repeatable, forgiving method—built around a patient 3‑day dry brine, low‑and‑slow smoke, and a hot final sear—turns holiday stress into predictable showstoppers. Ready to skip the guesswork? Jump to Recipe.
Why Prime Rib Deserves a 3-Day Game Plan
Why a 3-Day Plan
Prime rib is the kind of cut you pull out for celebrations: a big, theatrical roast threaded with silky ribbons of intramuscular fat that melt into the meat and give each slice a buttery mouthfeel. Because it’s cooked as a large format roast rather than individual steaks, everything about it — the marbling, the surface area, the expected show-stopping crust — raises guest expectations and raises the stakes for the cook.
Rush prime rib and you’ll see the usual sins: a gray band of overcooked meat around the edge, a surprisingly bland interior that taste-testing can’t fix, and a crust that never quite develops into that deep, mahogany, crunchy shell everyone raves about. Add big-guest timing stress to the list — prime rib is unforgiving when you’re guessing oven times or skipping proper seasoning — and a so-so roast can ruin the centerpiece of a dinner.
That’s where a three-day dry brine changes everything. Salting well in advance — ideally with kosher salt and left uncovered on a rack in the fridge for 48–72 hours — gives the salt time to dissolve surface proteins, draw juices out and then reabsorb them, carrying seasoning deep into the meat. The slow diffusion seasons through to the center, tightens muscle proteins so they hold onto moisture during cooking, and also helps the exterior dry enough to form a superior crust when seared. Practical tips: don’t wrap the roast while it’s brining, and allow the surface to desiccate slightly for better browning; use 1 teaspoon per pound if using Morton kosher salt; if using Diamond Crystal, use about 1/2–3/4 teaspoon per pound.
And let’s clear a kitchen myth: “bringing to room temperature” won’t meaningfully raise the center of a large roast — it only nudges the outer layers. The real benefit is that a planned, rested piece of meat cooks more evenly and lets you time the finish precisely. In short, a three-day plan trades a little calendar time for a lot of reliability: deeper flavor, fewer temperature surprises, a better crust, and far less last-minute scrambling when your guests arrive.

3-Day Dry‑Brined Smoked Prime Rib
Bone‑in prime rib dry‑brined for three days, slowly smoked for deep flavor, then finished with a high‑heat sear for a crisp crust and tender, juicy interior. Total time: ~3 days (includes 72‑hour dry‑brine) plus ~3–5 hours cooking; rest 15–20 minutes.
Ingredients
- Bone‑in prime rib roast6–8 lb
- Kosher salt1 tsp per pound (approximately 6–8 tsp)
- Coarsely ground black pepper2 tbsp
- Garlic powder1 tbsp
- Fresh rosemary, minced2 tbsp
- Fresh thyme, minced2 tbsp
- Olive oil2 tbsp
- Unsalted butter (optional, for finishing)4 tbsp
- Whole‑grain mustard (optional, rub)2 tbsp
- Wood chunks or chips (hickory, oak, or cherry)2–3 handfuls
- Beef stock (for au jus)2 cups
Steps
- 1
Trim any ragged pockets of fat but leave a 1/4–1/2 inch fat cap
- 2
If needed, tie the roast between bones or roll and tie for an even shape
- 3
Weigh the roast and calculate the salt at 1 teaspoon kosher salt per pound
- 4
Pat the roast very dry with paper towels
- 5
Rub the kosher salt evenly over every surface, working it into crevices
- 6
Sprinkle the black pepper, garlic powder, rosemary, and thyme evenly over the roast
- 7
Rub the roast with olive oil to help the seasonings adhere
- 8
Set the roast fat‑side up on a wire rack inside a rimmed sheet pan
- 9
Refrigerate the uncovered roast for 72 hours to dry‑brine, flipping once every 24 hours
- 10
Remove the roast from the refrigerator and let it sit 45 minutes before cooking
- 11
Preheat your smoker to 225°F with mild hardwood or preheat the oven to 250°F if not smoking
- 12
Insert a probe or instant‑read thermometer into the thickest part of the roast away from any bone
- 13
Place the roast in the smoker or oven fat‑side up and close the lid or door
- 14
Smoke or roast until the internal temperature is about 10–15°F below your desired final temperature. For rare, pull at about 105–110°F and finish searing to a final temp of roughly 115–120°F; for medium‑rare, pull at about 115°F and finish searing to roughly 125–130°F. Note: The USDA recommends cooking beef roasts to a minimum internal temperature of 145°F followed by a 3‑minute rest for food safety. This recipe targets lower culinary doneness common in restaurant practice; cooking to the lower temperatures listed here may increase the risk of foodborne illness for young children, older adults, pregnant people, and those with weakened immune systems—follow the USDA guideline for those diners.
- 15
Remove the roast and tent loosely with foil while you prepare a hot searing surface
- 16
Preheat a grill to very high heat, a cast‑iron skillet until smoking hot, or set the broiler to high
- 17
Pat the roast surface dry and brush lightly with oil for a better crust
- 18
Sear the roast on all exposed surfaces 1–2 minutes per side until deeply browned and crisp
- 19
Continue searing or rotate on the heat until the internal temperature reaches your final target — about 115–120°F for rare or 125–130°F for medium‑rare. For food safety, the USDA recommends cooking to 145°F with a 3‑minute rest; adjust to that guideline when serving young children, older adults, pregnant people, or immunocompromised guests.
- 20
Transfer the roast to a cutting board and rest loosely tented for 15–20 minutes to allow carryover (expect a 5–10°F rise) and for the juices to redistribute
- 21
Deglaze the drip pan with beef stock, scrape browned bits, simmer briefly, and strain for au jus
- 22
Carve between the bones or crosswise into thick slices and serve with the au jus
Skip the Foil: A Crucial Dry-Brine Warning
Do not wrap a salted roast in aluminum foil during the dry-brine: salt and the meat’s moisture can react with aluminum, degrading the foil and imparting metallic or off-flavors. Instead set the roast on a wire rack over a tray in the fridge, leave it uncovered or loosely tented with parchment, keep it refrigerated the entire time, and avoid cross-contamination by using clean trays and containing juices.
Smoke First, Sear Last: Dialing In Time, Temp, and Texture
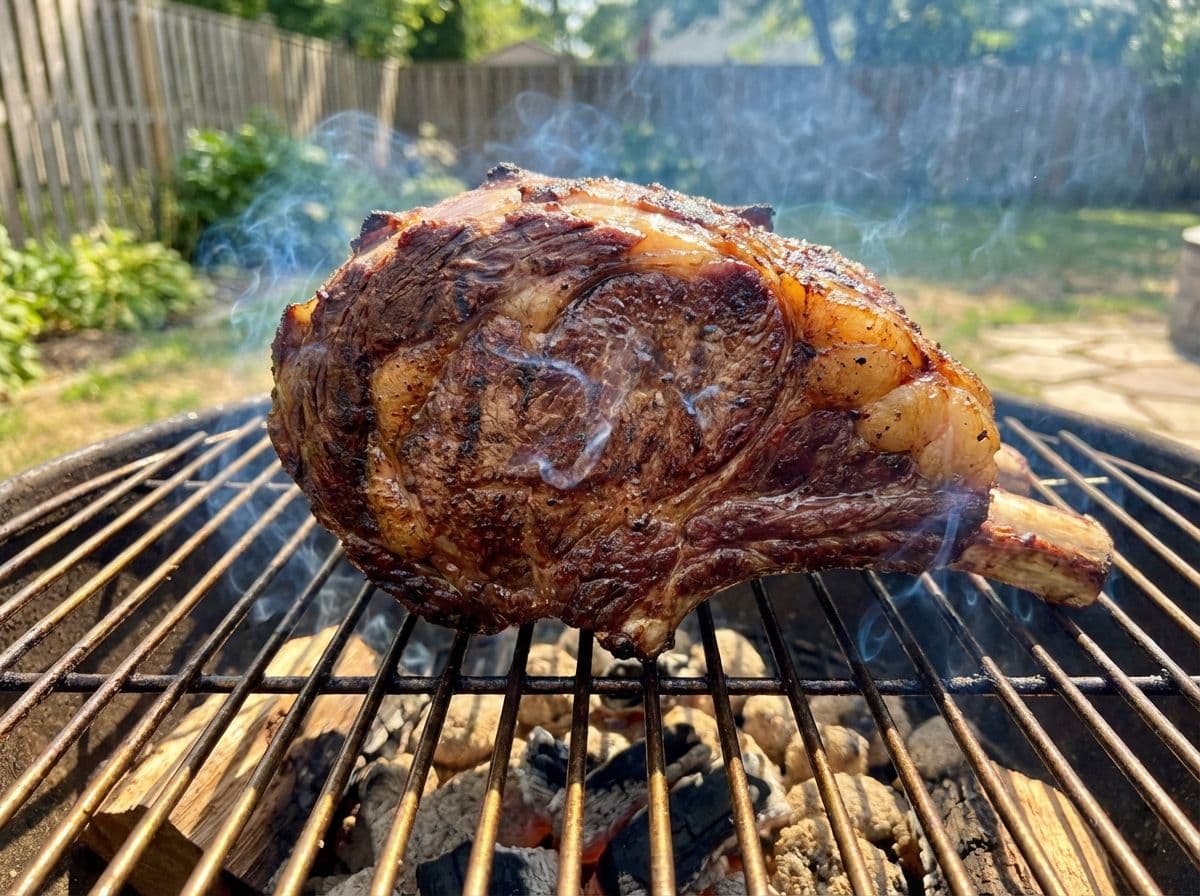
Reverse-searing is the simple magic behind reliably perfect prime rib: a patient, low-and-slow roast at about 225°F until the meat is roughly 10–12°F below your desired final temperature, then a short, violent sear at around 500°F to build a deep, caramelized crust. Cooking gently first minimizes the dreaded gray band and produces a more even medium-rare from edge to center—think a wide, rosy stripe through every slice instead of a thin, overcooked rim. The sear is where flavor and texture really arrive: sizzling fat, a lacquered mahogany crust, and that first hit of char and beefy aromatics that make each bite sing.
I break the rest into two short stages for good reason: after the low cook I rest the roast uncovered for 15 minutes so surface heat can dissipate and the exterior dries slightly—this protects the outer layers from being driven past your target during the final sear and helps the crust form instead of steaming. After the high-heat sear I tent the roast lightly and rest another 15 minutes to let the juices settle; slice immediately after that final rest so any remaining carryover won’t push it beyond your ideal doneness. Translate this workflow to any setup: use an offset smoker or pellet grill at 225°F for the smoke phase, then finish over the hottest part of the fire or a preheated searing plate; on a kettle grill, set up two-zone cooking (indirect at 225°F, direct coals for the sear); or low-roast in a home oven and transfer to a screaming hot gas or charcoal grill or a smoking-hot cast-iron skillet for the final crust. Always monitor with a probe thermometer, pull the roast a hair low, and let the two short rests do the heavy lifting—texture, temperature, and timing fall into place when you do.
Frequently Asked Questions
Bringing It All Together: A Foolproof Centerpiece Roast
After ten years of tweaking, the method stands on three simple pillars you can rely on: a three‑day dry brine to pull salt and deep flavor into the meat, a patient low‑and‑slow cook that builds even doneness and tenderness, and a high‑heat finish that forges a caramelized, savory crust. Together they give you a rosy, evenly cooked interior that yields little rivers of beefy jus and a crust that snaps under the knife—contrast and balance that turn a roast into a showstopper. Practical note: start the clock three days before service, salt evenly, and let the roast breathe on a rack in the fridge for the best dry brine effect.
Think of this recipe as a robust template rather than a rulebook. Swap the finishing rub for smoked paprika and coffee, switch woods if you’re smoking (apple for sweetness, hickory for a punch), or tuck an herb‑studded compound butter under the fat cap before the high‑heat sear. Pair it with creamy gratin, sharp horseradish, or charred Brussels sprouts—the roast will happily sit at the center while you customize sides, sauces, and service. One non‑negotiable: give the roast a proper rest after cooking so the juices redistribute; cutting too early wastes all that careful work.
Picture the finished platter: thick slices fanned across a board, edges dark and crisp, pale pink centers glistening, juices pooling and beckoning a crusty roll or Yorkshire pudding. The room quiets on that first bite—forks pause, conversations soften—and you know you’ve created more than a meal. Make this your signature by planning ahead, keeping notes on rubs and times, and embracing small tweaks each holiday until it becomes the version your friends and family ask for every year.