Revolutionary Rotisserie Turkey: Kettle‑Grill Magic Beyond the Oven
Swap the roasting pan for a Weber‑style rotisserie and you’ll get an evenly cooked bird with glassy, crackling skin and meat so juicy it practically falls off the bone. This method pairs an injected herb‑and‑cider brine with a slow, overnight rotisserie spin — the fat bastes itself as the turkey turns and I pulled mine off around midnight for perfect late‑night results. In this guide I’ll walk you through injection brining, the ideal rub and seasoning, target temperatures and timing, and pro tips for breaking down, reheating, and packing leftovers for travel.
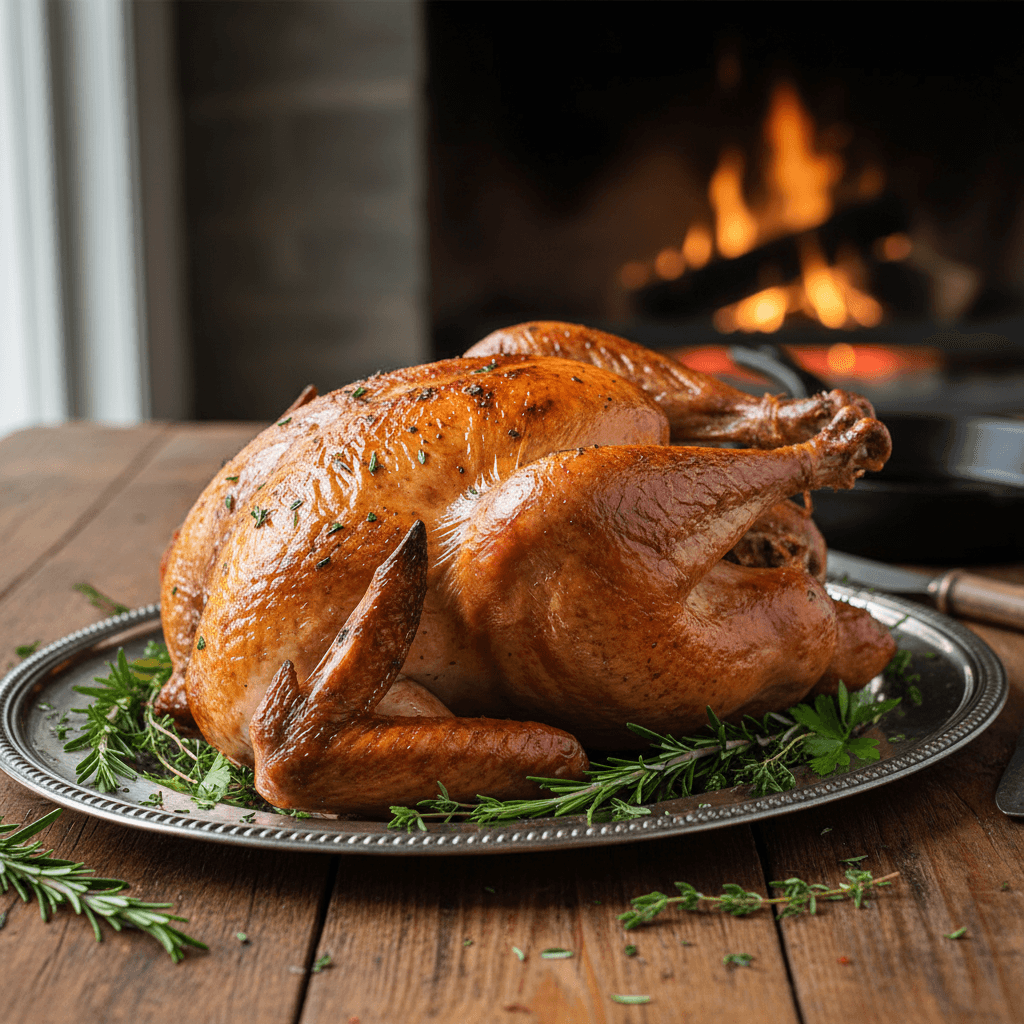
Rotisserie Turkey on a Kettle Grill
Juicy rotisserie turkey injected with an herby apple‑cider brine and finished with a crisp, lemony herb rub—designed for a 12–14 lb bird and built for a kettle grill rotisserie. Recommended timeline: inject and refrigerate 24–48 hours before cooking for good flavor penetration and a drier skin; if you prefer a deeper brine flavor you can extend the rest to 48–72 hours (tradeoff: slightly drier skin). Total time includes 24–48 hr injection rest (optional up to 48–72 hr), about 3–3.5 hours cooking, and a 20–30 minute rest; per serving roughly 350–500 kcal depending on portion, and this bird shines with mashed potatoes, roasted root vegetables, and pan gravy.
Ingredients
- Whole turkey, thawed12–14 lb
- Low‑sodium chicken broth (for injection)2 cups
- Apple cider vinegar1/3 cup
- Brown sugar2 tbsp
- Herbs de Provence2 tbsp
- Garlic, crushed4 cloves
- Kosher salt (injection)2 tbsp
- Kosher salt (rub)2 tbsp
- Black pepper, freshly ground1 tbsp
- Smoked paprika2 tsp
- Garlic powder1 tbsp
- Onion powder1 tsp
- Dried thyme1 tsp
- Dried rosemary, crushed1 tsp
- Lemon zest (rub)1 tbsp
- Olive oil (to bind rub)2 tbsp
- Unsalted butter or olive oil (optional under skin)2–4 tbsp
- Aromatics for cavity (optional): 1 apple, 1 onion, 1 lemon, handful fresh rosemary and sage.as listed
- Butcher twine and rotisserie spit hardwareas needed
- Charcoal, charcoal chimney, and a small handful of smoking wood chunks (optional)as needed
- Drip pan1 small pan
Steps
- 1
Trim excess fat and loose skin from the turkey and remove the giblets and neck from the cavity.
- 2
Whisk together 2 cups low‑sodium chicken broth, 1/3 cup apple cider vinegar, 2 tablespoons brown sugar, 2 tablespoons Herbs de Provence, 4 crushed garlic cloves, and 2 tablespoons kosher salt until dissolved.
- 3
Fill a meat injector and inject 1½–2 cups of the brine evenly into the breast, thighs, and drumsticks, depositing small amounts deep in the meat.
- 4
Place the injected turkey on a rack set over a tray and refrigerate uncovered for 24–48 hours to allow flavor penetration and gentle drying of the skin; you can extend to 48–72 hours for a stronger brine effect (expect slightly drier skin).
- 5
If your bird is larger than 18 lb, increase the injection and brine proportionally (roughly 1:1 per additional 6 lb) and plan on the longer cook time.
- 6
About 1–2 hours before cooking, remove the turkey from the fridge, pat the skin dry with paper towels, and let it temper in the refrigerator or a cool place.
- 7
Stuff the cavity loosely with optional aromatics (quartered apple, onion, halved lemon, and a few sprigs of rosemary and sage) for fragrance while it rotates.
- 8
Tie the legs together and secure the wings against the body with twine or small skewers to prevent flapping on the spit.
- 9
Combine the rub ingredients—2 tbsp kosher salt, 1 tbsp black pepper, 2 tsp smoked paprika, 1 tbsp garlic powder, 1 tsp onion powder, 1 tsp dried thyme, 1 tsp crushed rosemary, 1 tbsp lemon zest—and stir in 2 tbsp olive oil to make a paste.
- 10
Gently loosen the skin over the breasts and spread 2–4 tablespoons butter or some of the rub paste under the skin, then massage the remaining rub all over the outside of the turkey.
- 11
Mount and balance the turkey on the rotisserie spit, tightening the spit forks and checking that the bird spins evenly without wobble.
- 12
Set up the kettle for indirect rotisserie cooking with coals banked to the sides, a drip pan beneath the bird, and a few wood chunks on the coals for smoke if desired.
- 13
Start the rotisserie motor and stabilize the grill temperature between 325–350°F, adjusting vents and adding coals as needed to maintain heat.
- 14
Cook the turkey until the thickest part of the thigh reaches 165°F and the breast reads about 160–162°F on an instant‑read thermometer. As a rough estimate this often works out to about 11–14 minutes per pound on a kettle rotisserie, but rely on internal temperature rather than time alone—rotisserie setup and fuel can change the pace.
- 15
When the target temperatures are reached, remove the turkey from the spit, transfer to a cutting board, tent loosely with foil, and rest for 20–30 minutes to allow carryover and juices to distribute.
- 16
Skim the pan drippings and reserve them for gravy or to spoon over carved slices for extra gloss and flavor.
- 17
Carve the rested turkey and serve with classic sides such as mashed potatoes, roasted root vegetables, cranberry relish, and warm pan gravy.
Why Rotisserie Turkey Beats the Oven
Rotisserie cooking is essentially self-basting in motion: as the bird slowly spins, rendered fat and juices collect and flow over the meat repeatedly, bathing the breast and thighs in flavor. That constant rotation yields remarkably even cooking and an all‑around golden, crackling skin you just don’t get from a static roast. Slice into a rotisserie turkey and you’ll notice the juices bead and glisten on the surface, the meat pulling away in moist, tender ribbons rather than dry fibers.
An oven can be an efficient tool, but it’s still stationary air surrounding the bird; evaporation is less aggressive and pockets of steam develop around crevices. That is why many oven turkeys end up with a slightly “steamed” texture and skin that struggles to crisp. Injecting or brining before you cook — whether with a savory herb‑and‑cider mix, a salt solution, or a spiked butter injection — seasons the interior and gives the breast extra protection, helping it stay juicy long enough for the dark meat to reach proper temperature.
A kettle grill adds another dimension: smoky, charcoal notes kiss the skin and mingle with the turkey’s own browning flavors in a way a standard oven simply can’t replicate. Best of all, once you’ve got the bird securely trussed on the spit and the grill holding a steady temperature, the cook becomes mostly hands‑off — occasional fuel checks and thermometer reads, not constant babysitting. The payoff is worth the extra gear and prep: evenly cooked, deeply flavored meat with a crisp, savory skin that makes the whole process feel like a holiday revolution.
The Three-Day Game Plan: Injected Brine, Rub, and Setup
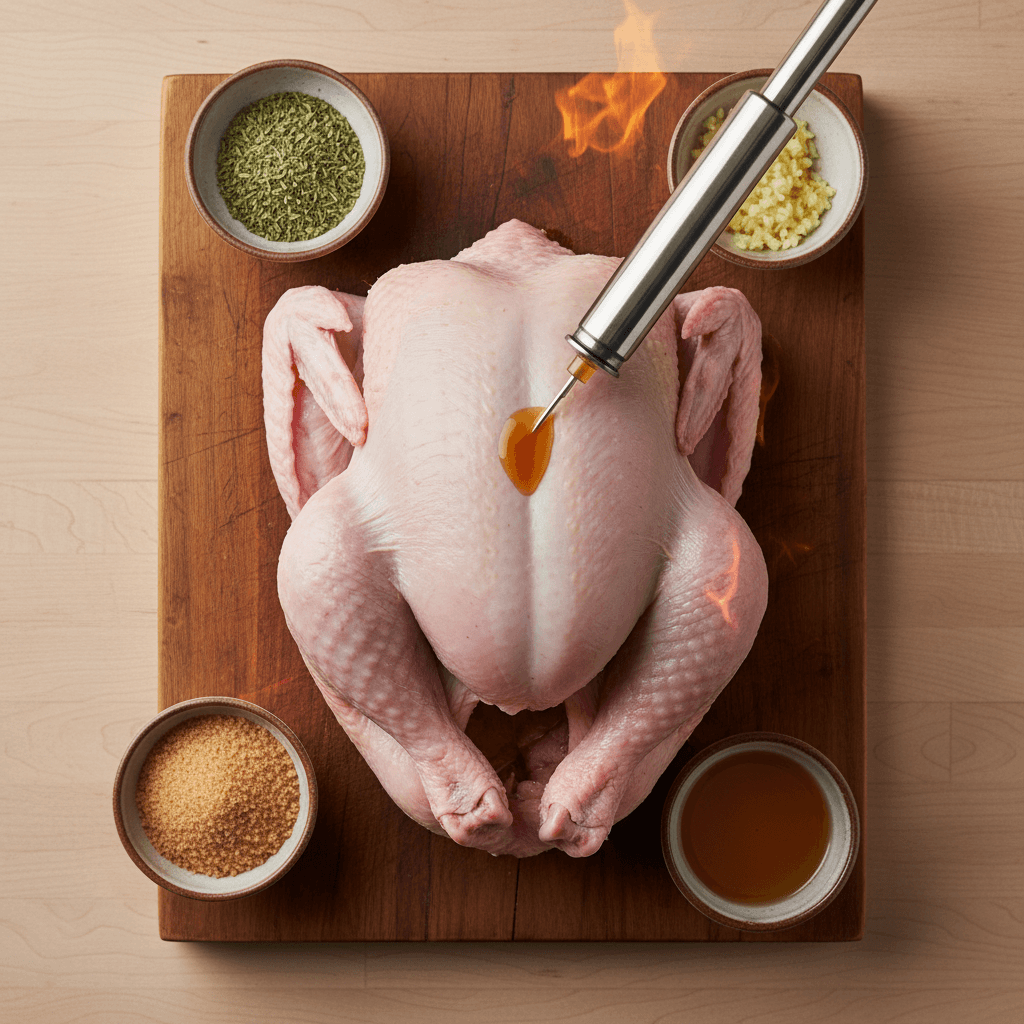
Day 1 — Thaw, trim, and inject: Start with a fully thawed bird, pat it dry and trim excess fat and loose skin so the spit holds the turkey close to the meat. Mix a concentrated injection: warm 2 cups stock or water, 2 tablespoons kosher salt, 2 tablespoons brown sugar, 1/3 cup cider vinegar, 2 tablespoons herbs de Provence and 4 smashed garlic cloves (heat just enough to dissolve the sugar and salt, then cool). Use a culinary injector and work from the inside out: aim for the thick muscle of the breast (6–8 shallow injections), then the thighs (4–6 injections per thigh) and 2–3 injections in each drumstick. Deliver about 1–2 teaspoons of liquid per insertion and withdraw slowly as you inject to avoid pockets. Spread the injections so the solution disperses through the muscle instead of sitting in one spot — this prevents oversalty pockets and ensures an all-over, subtle lift of flavor. Refrigerate the injected turkey uncovered for at least 8–12 hours or overnight to let the solution distribute.
Day 2 — Dry and rub: The secret to glassy, crackling skin is drying. Pat the turkey thoroughly and leave it uncovered on a rack in the fridge for 24 hours; the air will dehydrate the skin so it crisps beautifully on the rotisserie. When you’re ready to season, rub a fragrant blend over the exterior: a tablespoon or two of herbs de Provence, several crushed garlic cloves, a teaspoon of black pepper, a touch of smoked paprika and a coating of oil to help the rub adhere. Massage the rub under any loose skin and over joints for even flavor. Day 3 — Truss, balance, and light the grill: truss the legs tightly with butcher’s twine, tuck the wings under, and center the cavity on the spit so the bird rotates level. Use the rotisserie forks to clamp the turkey close to its center of mass and tighten until the bird doesn’t wobble when you spin it by hand. Set up your kettle for indirect heat: bank coals or use charcoal baskets down the sides of the grill and leave the center clear for a shallow drip pan (add a cup of stock or beer to the pan to capture drippings and reduce flare-ups). Aim for a steady grate temperature of 325–350°F; with rotisserie cooking you can expect roughly 11–14 minutes per pound as a planning figure, but let internal temperature be your guide — pull the turkey at 165°F in the breast and 175–180°F in the thigh, then rest 20–30 minutes tented loosely. The result should be deeply bronzed, herb-scented skin and meat that’s glossy and juicy when you slice into it.
Night‑owl & Travel Tips
Always use a reliable instant‑read thermometer and check at least two spots (breast and thigh); pull the bird at about 160–162°F and let it rest 20–30 minutes so residual heat evens out and juices redistribute before carving. If you finish late or need to travel, cool the turkey within two hours—carve and refrigerate portions or vacuum‑seal pieces—and reheat gently (sous‑vide or low oven at 250–275°F) to preserve moisture and ensure food safety.
Frequently Asked Questions
This Is the Way: Making Rotisserie Turkey Your New Tradition
Once you’ve tasted a properly brined, rotisserie‑cooked turkey, it’s hard to go back to the oven. The skin caramelizes into a crisp, savory shell while the constant rotation lets savory juices baste the meat from the inside out, yielding an evenly cooked breast and thighs that still sing with moisture. Aromatic herbs and browned garlic perfume the air as the bird turns, and the first slice reveals a glossy, steam‑kissed interior that proves why this method has moved from novelty to staple in so many backyards.
Think of the base recipe—brine, injection, rub and steady rotisserie heat—as your blank canvas. Once you understand those fundamentals, experiment: switch herbs (thyme and rosemary for classic notes, herbes de Provence for floral complexity), swap smoking woods (apple or cherry for fruit sweetness, hickory for depth, mesquite sparingly for bite), or tweak injection liquids with citrus, cider, butter, or a touch of brown sugar for caramelized edges. Small tests on turkey parts or a crown will teach you how much smoke or sweetness you prefer without risking the whole bird.
Now for the fun part: plan your own three‑day turkey timeline, fire up the rotisserie, and invite family or friends to watch the show. A simple plan—day one to brine or inject, day two to rest, season and let flavors meld, and day three to roast and carve—gives you control and reduces day‑of stress. When the moment comes, flip the switch, enjoy the ritual of slow turn and sizzling skin, and be ready to carve into arguably the juiciest bird you’ve ever served. Make it your new tradition, then keep iterating until you’ve landed on your signature rotisserie turkey.